VW Vanagon Westfalia Pop-Top – Reducing Heat Loss – Part 1 – Roof

img_6830

I’ve been experimenting (non scientifically) with insulation this winter in my 1983.5 Vanagon Westfalia. It gets quite cold here in Michigan this time of year, so I need to keep warm and be as energy efficient as possible. I heat the van using a Little Buddy propane heater, and an electric space heater.  During the day I leave the heat off in the van, and when I return in the evening I turn both heaters on to bring the van up to temperature. Once the temperature is at a comfortable level, I switch over to just the electric space heater. The Little Buddy space heater really helps heat things up quickly, but I’m not crazy about the slight smell it gives off.

The following post illustrates just how much heat loss is occuring through the roof of our pop-tops, and one way to alleviate the heat loss using Reflectix.

The following pictures were taken on the evening of December 22nd.

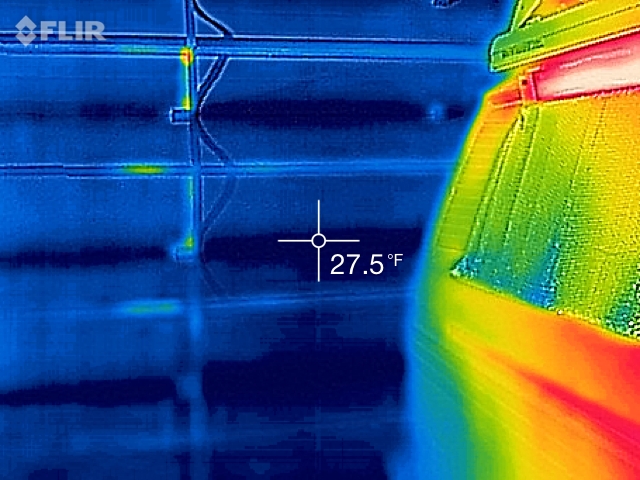
The temperature inside the unheated barn where the van is, as measured from the inside of the insulated barn door, was 27.5 degrees Fahrenheit:

img_6892


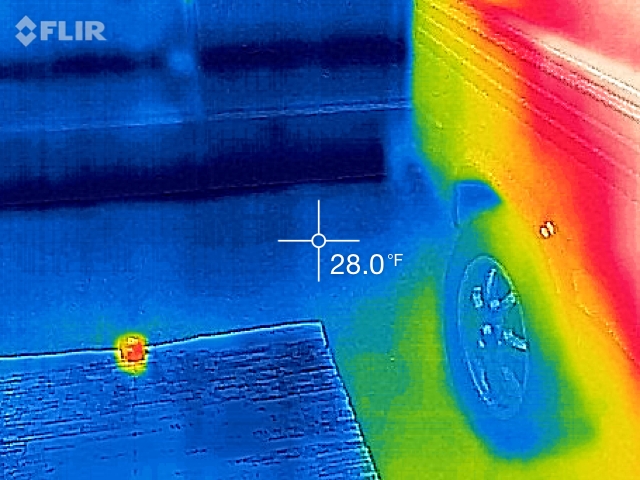
The temperature of the floor was 28 degrees Fahrenheit:

img_6894


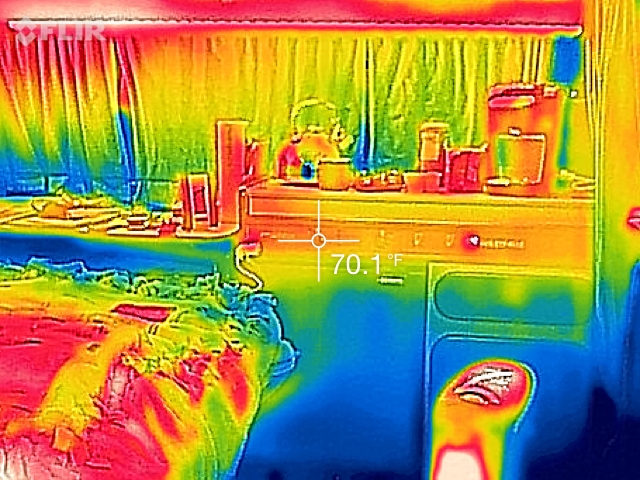
The temperature inside the van was about 70 degrees Fahrenheit:

img_6909


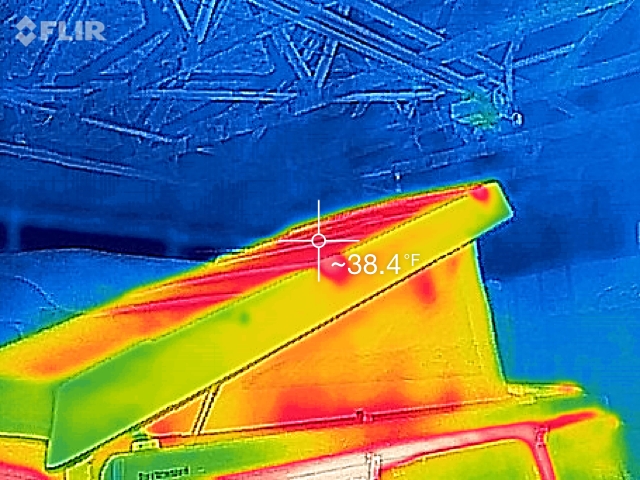
The following picture of the roof was taken before I added the Relectix to the ceiling.  You can see that the temperature of the roof is 38.4 degrees Fahrenheit, and quite a bit warmer than the ambient temperature inside the barn. Between 10-11 degrees warmer. In other words, I’m loosing a ton of heat through the roof itself.

img_6891


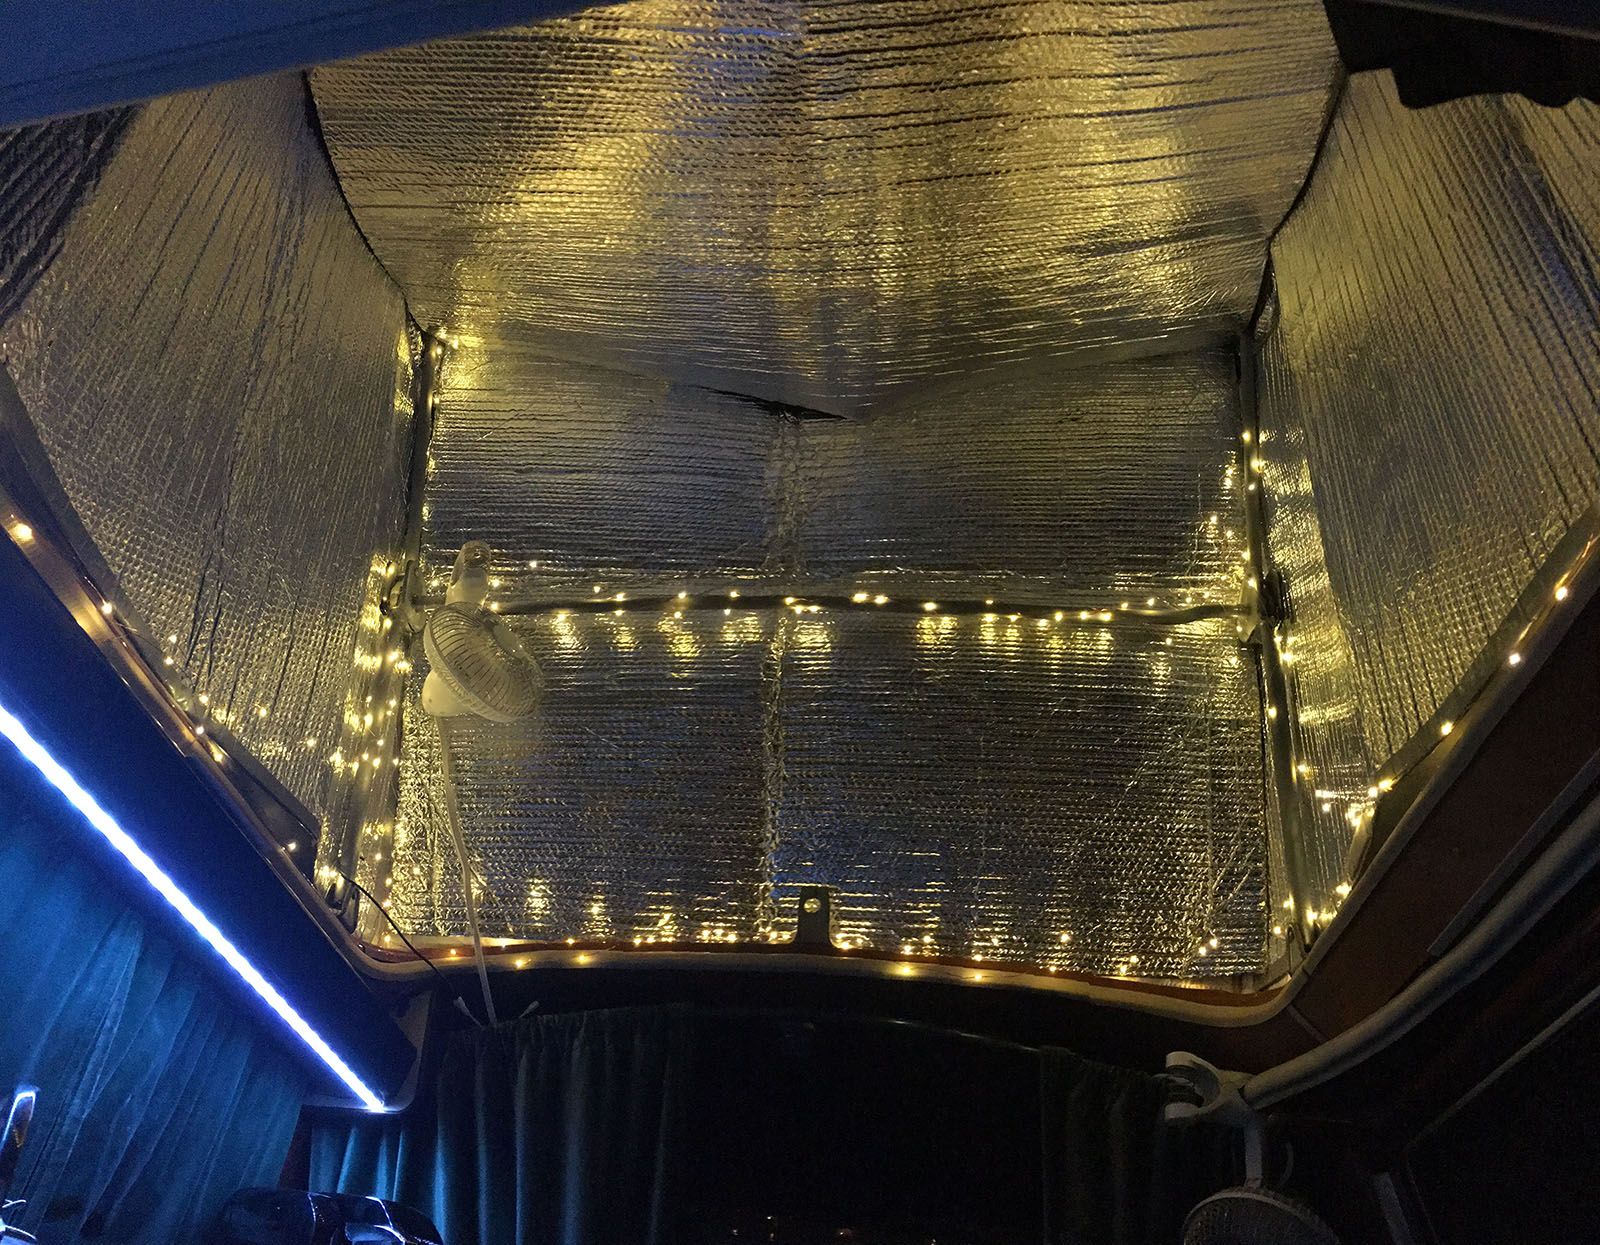
After seeing this, I went to my local hardware store and purchased a roll of reflectix. It was pretty much the perfect width for the ceiling of the pop-top. I cut a piece off the roll and loosely placed it on the ceiling of the pop-top and then went to bed. The Reflectix was precariously held in place by some other Reflectix I already had along the tent walls. I actually have two layers of insulation along the tent walls.  First, I have Fanchers.com’s thermal insulation product snapped into place. I have that sandwiched between the  tent wall and the Reflectix you see in the picture below. The Fancher’s product does a great job by itself, but I already had the Reflectix from the previous owner of the van, so I use it as well. Every bit helps!!  Here’s a picture of the Reflectix installed on the ceiling (it’s not pretty, I know):

img_6901_2

Looking at the picture above reminds me of the lawyer character, Chuck McGill, in the TV show “Better Call Saul”.  The one that is has the electromagnetic sensitivity condition (psychological) and tries to shield himself from it all.  Oh no…  LOL!

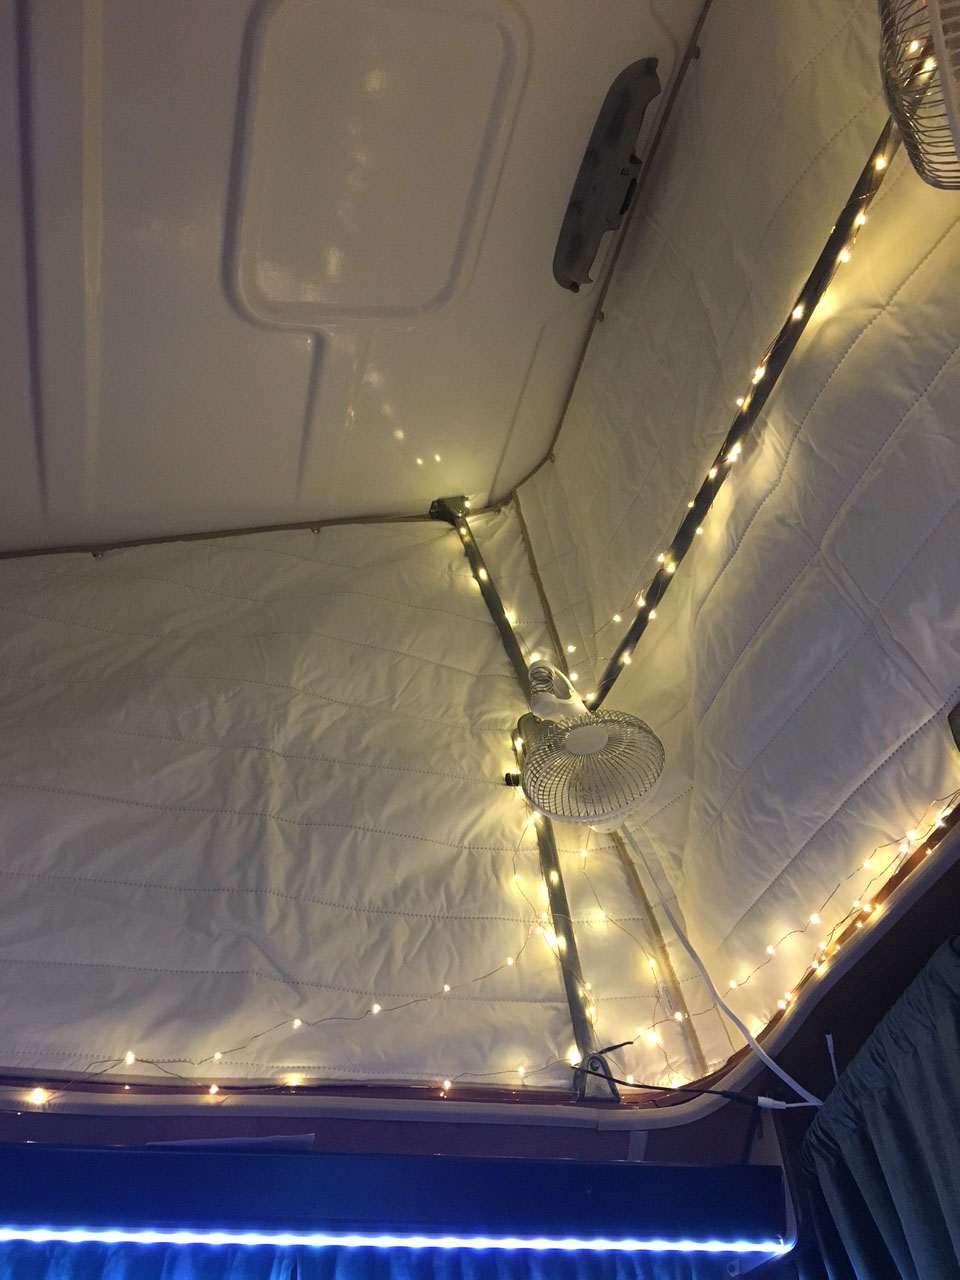
For reference, here’s a picture of the Fanchers.com thermals installed by itself (much nicer looking and cozy):

img_6866_2


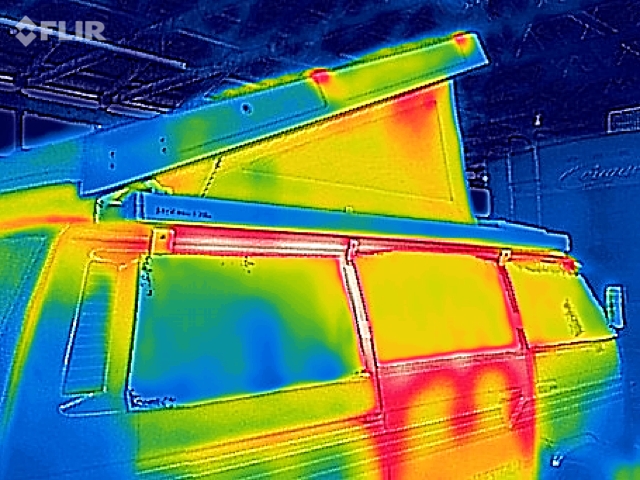
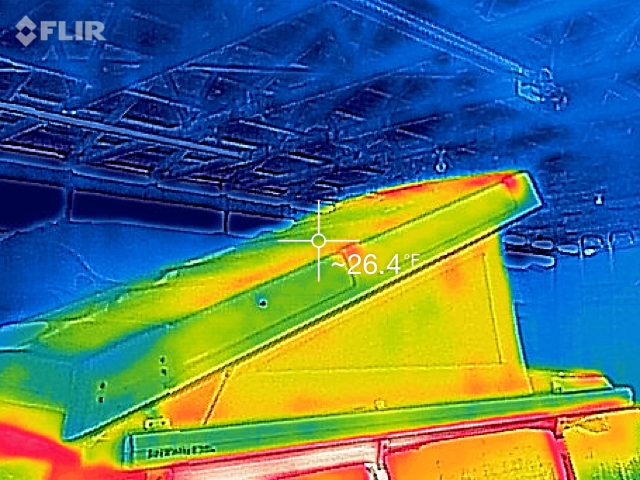
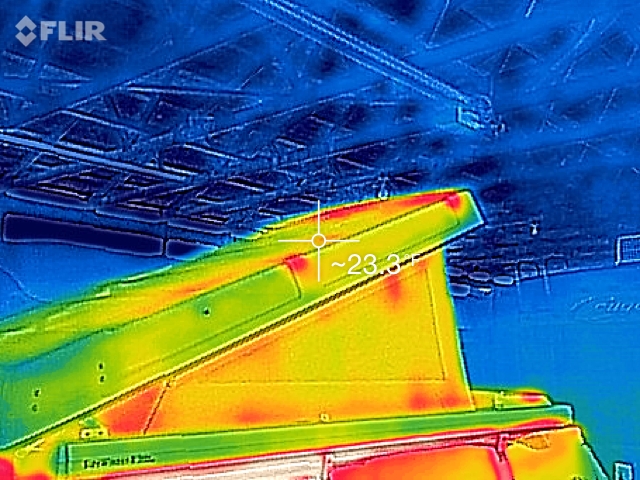
The following pictures were taken the following morning, December 23rd.  The Reflectix ceiling panel had been in place all night.  As you can see, the temperature of the van’s roof is much lower and closer to the ambient temperature in the barn.  Less heat loss!  Sweet!

img_6907

img_6903

img_6902

img_6905

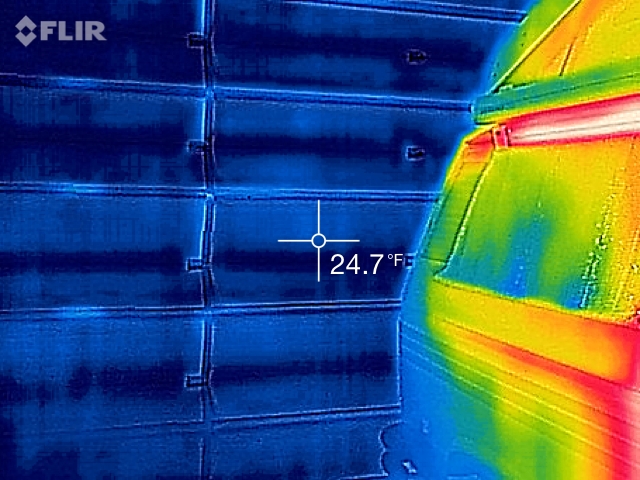
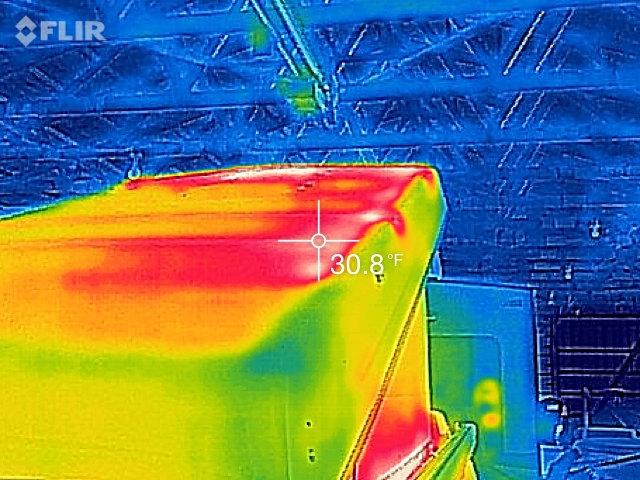
In the following picture, you can see how the temperature along the passenger side of the pop-top is quite red, and the temperature is warmer than my readings above.  Like I mentioned earlier, the ceiling panel was loosely placed along the ceiling. It must have shifted overnight, leaving a gap for some warm air to escape.

img_6906


If you’ve read this far, thank you!  I appreciate it! =) Hopefully this has helped you in some small way when it comes to your insulating questions. I feel the Reflectix ceiling panel is quite effective at keeping the heat in.  It’s now less drafty, and the heater seems to kick on much less than it used to.

Come back soon for several more installments on this topic.  I’ll be doing a post showing the effectiveness of insulation on the tent walls, and also the windows themselves.

POST EDIT (01/01/2017): Part 2 is now up! See it HERE!

Water Bath For Developing Film At Home – C41 E6 B&W

Here is a quick video, some pictures, and a parts list for my over engineered water bath. I will use this water bath for processing color film where maintaining temperature is critical for success. Of course, it could be used for processing B&W film too.

Note: This is by no means a detailed how-to/tutorial. It’s just a video, some pictures, and a list of parts that I used to make it. Hopefully it will give you some ideas for making your own water bath.

Video

Parts List

-Water Tank – I had my stainless steel tank already. You could search ebay for something that might work, or maybe you can find something at your local hardware.

PID Temperature Controller, Thermocouple, SSR (Solid State Relay) – I didn’t use the Thermocouple (Temperature Sensor) that came with this kit. The thermocouple is not water tight. I could have sealed it up with a bunch of sealant, but that’s not my style. I purchased the liquid tight RTD sensor below instead. You may be able to find this PID for cheaper if you purchase just the PID without the Thermocouple. You’ll need to purchase the SSR (Solid State Relay) separately as well though, so it may be a wash.

120 GPH Submersible Aquarium Pump – (Qty: 2) – The pumps circulate the water in the tank. You can probably get away with one pump, but I like two. It will depend on the size of your water bath tank too. The video shows only one pump.

Liquid tight RTD sensor, 2 in, 1/4 NPT Thread (Deluxe Cable) – This is the sensor that monitors the temperature of the water in the tank.

1000 Watt Heater Element
Power Inlet
Die Cast Aluminum Enclosure
External Mount Heat Sink for 25A SSR
Brass Pipe Fitting, Locknut, 1/4″
Brass Pipe Fitting, Locknut, 1″

Red 15A Single Round Outlet Receptacle – The red outlet is controlled by the PID controller and turns on/off based on the water temperature. It’s what I plug the heater element (yellow cord) into. You don’t have to use a red receptacle. I just thought it was cool.

Hubbell AC Receptacle 15A/125 vac – (CNE) HBL5261D
1 Gang Weatherproof Electrical Outlet Box
-2 A/C Neon Indicator Lights (1 Red, 1 Green)
-A/C On/Off Toggle Switch
-An old yellow extension cord I had laying around
-A power cord from an old computer to power the controller/system.

Pictures

01

01a

02

03

04

05

02b

02a

10

08

11

17

07

21b

21a

22

13

14

18

19

20

15

16

12

21

23

1966 VW Beetle Project – Final Post – The Buyer

This is my final blog post for my ’66 Beetle Project.  I want to share with you some pictures and a voicemail message from the person that purchased the car, Chris Vallone. You may have heard of him.  Chris is well known in the VW community. He restores classic VW bugs, is the owner of Classic VW Bugs, and is an educator of VW restoration.  He has a YouTube channel where he provides free video content for people wanting to learn the art of aircooled VW restoration, or how to just keep them running.  I’ve certainly watched many of his YouTube videos. Chris is a real asset to the VW community. I was pleasantly surprised, and excited, that Chris took a liking to my car and purchased it.  I feel like my project couldn’t have ended on a better note.

After receiving the car, Chris called to tell me how much he liked it. Unfortunately I missed his call, but he left me the voicemail message below (click to listen).

I guess missing the call wasn’t so bad after all, because I wouldn’t have this voicemail message otherwise.  The message meant a lot to me, and my family as well.  Thanks Chris!

Here’s a couple of pictures of Chris and his Dad with the car. Of course they added their touches to the car (stock height on the front end, white walls), which I like very much.

DSC07375

DSC07371

(Posted with Chris’ permission.)